What follows below is a description of how CDs and DVDs store data followed by the differences in materials needed for recordable and rewritable CDs and DVDs. At first, everything is discussed for CDs only; but the differences between CDs and DVDs are actually only of the sizes of the track and bumps and the laser wavelength, so the differences are explained after the basics. Then the recordable/rewritable cases are presented.
Basics of a read-only CD
 Schematic of a CD sprial Schematic of a CD sprial |
A CD is a circular information storage medium. The information is stored on a single long spiral track going from the inside to the outside. The figure on the right illustrates this pictorially but is it not to scale: the track is very narrow and very long. Specifically, the track is standardized and is 0.5 microns or 500 nm across, but if stretched out onto a straight line it is about 5 kilometers (about 3.5 miles) long! For your reference, a sheet of paper is 0.1 mm or 100 micrometers wide; a human hair is typically between 50-200 micrometers wide: the CD track is thus very narrow. The distance between successive turns of the spiral is also standardized at 1.6 micrometers.
If we turn the CD on its narrow side, it is 1.2 mm thick. If you slice through it to see the cross section with the label (top) side upwards, you will find what is shown in the next schematic figure below. In terms of the process used to make a CD, let’s start with the bottom polycarbonate layer. Polycarbonates are a type of plastic which are quite temperature and impact resistant and are highly transparent. During manufacturing, the polycarbonate is imprinted with the long spiral track which contains the data in the form of various bumps (viewed from below) or pits (viewed from above) — see further below for how this works. When viewed from the top, the depressions are called pits and the elevated flat parts are called land. The depth of the pits is standardized at 125 nm. Next, a thin layer of aluminum is deposited on top of the polycarbonate which covers the track, land and pits. Aluminum is chosen as it is relatively inexpensive but also quite reflective. Next a layer of acrylic (another plastic that is cheaper than polycarbonate) is deposited to protect the aluminum. Finally, a layer of labeling can be applied onto the acrylic if desired.
 Cross sectional view of a CD Cross sectional view of a CD |
If we zoom into the CD looking in from the polycarbonate side, we might see something like shown in the next figure below. What is shown is a schematic where the spiral is going say from left to right and has crossed our view twice. The pits are 125 nm deep, 500 nm wide, and the length can vary anywhere from 850 nm to 3500 nm (3.5 micrometers). The standardized track spacing (called pitch) of 1.6 micrometers is also shown.
 Bumps in the polycarbonate layer of a CD Bumps in the polycarbonate layer of a CD |
Below are two actual images obtained by using a scanning electron microscope (SEM) of actual CD and DVD surfaces. These images were obtained at Yale by an SEM hosted by the Yale Institute for Nanoscience and Quantum Engineering (YINQUE). The bright “pills” are the pits. The only real difference between the CD and DVD is that everything for the DVD is smaller: narrower and shorter pits and a smaller pitch to pack everything in more tightly. As you’ll see below, this means denser storage of information, so a DVD can store more data per unit area than a CD.
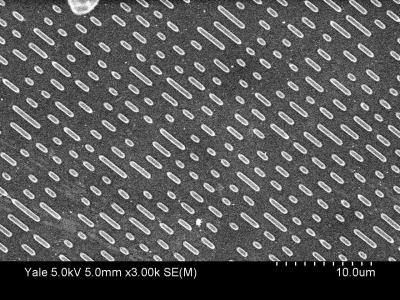 SEM image of CD surface. Each tick is 1 micrometer (m). SEM image of CD surface. Each tick is 1 micrometer (m). |
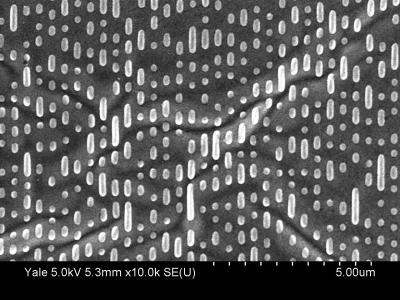 SEM image of a DVD surface. Each tick is 0.5 m or 500 nm. SEM image of a DVD surface. Each tick is 0.5 m or 500 nm. |
Now you might ask, how is this all related to information stored on the CD?
As you know, information is fundamentally represented in digital form as bits or ones and zeroes. For a CD, the system chosen is slightly unusual in the presence (or absence) of a bump does not mean one or zero. Rather the transition from a bump to a flat region or a flat region to a bump represents a one while no transition (i.e. a relatively long region that is either a bump or is flat) represents zero. The next question is how this information is read off the CD: how does the CD reader figure out if there is a bump or a flat region?
 Schematic showing how a CD or DVD is read by a laser Schematic showing how a CD or DVD is read by a laser |
The solution to reading the data off the CD is rather straightforward and is based on simple reflection. We’ve all used a mirror to reflect sunlight onto a wall and then to make the reflected light move around by changing the angle of the mirror. In a CD reader, the source of light is a semiconductor laser at a fixed wavelength of 780 nm. Note that 780 nm is in the infrared and not visible to the human eye; you can’t see the CD player’s laser shining on the CD with your naked eye. The laser produces a narrow beam of light incident on the bottom surface of the CD. The beam goes through the polycarbonate, is reflected by the aluminum, and then comes back through the polycarbonate and exits the CD to reach a photodiode detector. The laser shoots the beam at a slight angle to the CD surface, so the presence or absence of the bump will change the angle at which the beam is reflected towards the detector. This changes the intensity of reflected light the detector records and thus the presence or absence of a bump will be observed. The schematic on the right tries to show this; the angle of reflection is greatly exaggerated in the schematic to show the reflection: in practice, the angle is quite small.
CDs versus standard and Blue-ray DVDs
From the materials and functioning perspective, the only difference between CDs and DVDs are the sizes involved. The main ideas and basic technology is essentially identical. However, as you know, DVDs are the same physical size as (standard) CDs can store a great deal more information than CDs: how is this accomplished? The main idea is to store the data more compactly. Specifically, the bumps can be shorter so more can be stored per unit length, and the tracks are closer (smaller pitch) to pack them in tightly as well. Numerically, the bumps for a DVD are around 400 nm long, instead of around 800 nm for a CD. And the spiral track’s pitch is now 0.74 micrometers (740 nm) instead of 1.6 micrometers. In order to be able to focus the laser onto these smaller bumps, a shorter wavelength of light is needed: there is a basic principle in optics that under the best focusing conditions, a light beam can be focused onto a spot that is always about as large as its wavelength. So shorter wavelength means a smaller focused spot of light and thus the ability to see smaller features. The lasers uses in DVD players operate at a wavelength of 650 nm (instead of 780 nm in a CD). 650 nm is visible for the human eye and corresponds to a red color: you’ve probably noticed that there is a red light shining onto the DVD surface inside the player.
Blue-ray disks are also a variety of DVD disks: again, they have the same physical size as standard CDs and DVDs but can store even more information. Again, all the ideas are the same but all the features (bumps and track pitch) are smaller than standard DVDs. Also the laser must have a shorter wavelength, and operates at 405 nm. This is visible and in the blue-violet region, hence the name!
Recordable/rewritable CDs and DVDs
Up to now, we have described how CDs and DVDs work when the CD or DVD is for permanent storage: the information on the medium is encoded in the physical heights of the bumps and thus can’t be changed. This type of permanent storage is great for storing music or movies or permanent backups. But what if one wants to write one’s own CDs or DVDs or perhaps use the medium for rewritable storage? As you probably know writable (one-time write) and rewritable CDs and DVDs have been available on the market for some time. But how do these actually work from the materials point of view?
Looking at the above description, we note that the basic mechanism for reading the data on a CD or DVD is that a laser beam is bounced off the surface and the reflected light is measured: the bumps on the surface modify the reflection. But one is not limited to physical bumps: any type of change to the medium material which changes the reflection will have the same effect. Therefore in (re)writable CDs and DVDs there are no physical bumps or height differences but instead the material changes its properties so as to have different reflectivity with size scales mimicking real bumps. To be precise, for (re)writable CDs and DVDs, the schematic cross section is shown below: in addition to the aluminum layer, there is are additional layers (of which the phase change material is the critical one) where all the reflectivity changes are happening. (The dielectric is highly transparent so it doesn’t participate significantly in what goes on.) If the phase change material is pretty transparent, the laser beam goes through it and reflects of the aluminum layer behind it and bounces back out. However, if the phase change material is opaque or absorbing, most of the laser light gets absorbed with little reflection and thus from far away one observes a change in reflectivity.
Cross sectional view of a (re)writable CD-R
So, what is this “phase change material”? These are materials that can be easily coaxed to exist in two different phases as solids at room temperature. One is a crystalline phase and the other is the amorphous phase (defined below). The two phases have the same chemical composition: the same number of atoms of the various elements; it is just that the atoms are arranged differently in the two phases. The crystalline phase is transparent while the amorphous one is opaque.
You may now ask: what is the difference between crystalline and amorphous phases? Doesn’t the solid phase of a material just have a single structure at the atomic level? In practice, most natural materials or artificial materials are in a single solid phase. But that does not mean that that is the only way they can be. It has all to do with how orderly the material is at the atomic level, and that in turn has to do with how quickly it was cooled down from the melted form: the slower the rate of cooling, the more orderly the solid phase is at the atomic level.
It is best to deal with a specific example. Quartz and glass present the most common example of crystalline versus amorphous forms of the same material. Both are made from silicon dioxide (chemical formula SiO2). SiO2 is very common on earth and is the main ingredient in the earth’s crust, sand, and most rocks. Quartz is the most stable crystalline form of SiO2: by crystalline we mean that the atoms are bonded together in an orderly manner and that motif repeats itself over and over in entire solid. In the crystalline quartz phase, all the Si and O atoms are bonded together in a very orderly manner Each Si is bonded to four O and each O to two Si and the bond lengths and angles between the bonds repeated themselves regularly throughout the material. This is very much like a regular tiling you would see in a bathroom or shower where tiles are laid out in a repeating motif and the pattern of tile colors would repeat over and over. The amorphous phase, on the other hand, has basically the same number and types of bonds between Si and O atoms: each Si has four bonds to four O and each O has two bonds to two Si but the angles and lengths of the bonds are variable throughout the material. This is much harder to imagine, but it would a type of tiling where the tiles aren’t all the same size and they are not exactly placed together correctly, and one just tries to continue the tiling pattern so one ends up with an irregular structure where essentially all tiles have the correct number of neighboring tiles (although there may sometimes be some voids or extra tiles) but there is no repeating motif. If you start with melted silicon dioxide and cool it very slowly, you end up with quartz: the atoms are giggling around randomly due to the thermal energy and one is giving them enough time to find the right partners and to bond with them in the right order and orientation to form a good crystal. If, however, one cools the melt too quickly, the atoms do not have enough time to get into an orderly structure and the ending structure is amorphous. It is very much like a musical chairs game where, for example, half the players have blue shirts and half the players have red shirts and we ask each blue player to sit between two red players (and vice versa): if you give people enough time to move around and find the right neighbors, the desired pattern is found; but if one gives too little time and then insists everyone sit as quickly as possible, chances are the seating will not be in the desired order. See the image below for a visualization of the crystal and amorphous phases (and their uses in recording information as per what follows).
Now quartz and glass are optically very similar: they are both highly transparent. So you can’t use glass and quartz as a phase change material. The main difference between them, aside from the atomic level organization, is that glass will flow once heated sufficiently which is what makes it so useful in technology and art, whereas quartz is a solid that does not flow or bend up to its very high melting point. In science and technology, and amorphous material that start to flow easily once heated to an appropriate temperature is termed a glass (a technical term which includes everyday glass but many other materials as well such as many plastics and polymers).
So far, the only way we could create a crystal or a glass is by controlling the rate of cooling from a melt. And this is usually how one does it. But there are some variations which are useful for (re)writable CD/DVDs that we now explain. A crystalline solid can be melted by raising its temperature above its melting point, which we will denote by the temperature Tm: this is the temperature at which the atoms making up the solid decide to give up the regular bonding arrangement (which is low in energy but also low in entropy) to enter the liquid state (higher energy but also higher entropy). The reverse process of starting with a melt and cooling below Tm is more dependent on the cooling rate: as explained above, if done it slowly one gets a crystal and if done quickly one gets a glass. A slow cooling intended to give a crystal is called annealing while a fast cool intended to give an amorphous phase is called quenching. Now imagine one did a quick cool and ended with a glass. If one raises the temperature to an intermediate temperature that is below Tm but above the crystallization temperature Tc, the atoms of the amorphous phase now have enough thermal energy to move around a bit and explore new configurations; if given sufficient time, they can start to form crystal phases. Notice that this Tc is not a true temperature of a phase transition (like Tm is): it is rather the temperature above which the crystallization proceeds “quickly” on the time scale one is interested in. So one can contemplate the following operations: starting from a crystal, one heats past Tm to get a melt, and then one cools rapidly all the way below Tc to get a glass; to replace the glass by a crystal, one heats up the glass above Tc but below Tm and waits a short while for crystals to form and then can cool down again. For phase change materials used in CDs and DVDs, Tc is around 200oC while Tm is in the 500-700o range.
A subclass of glassy materials have the useful property that their crystalline and amorphous phases have significantly different optical properties. For phase change materials used in (re)writable CDs and DVDs, the crystalline phase has more opaque (more absorbing of light) than the amorphous phase. Thus changing the phase of the material will change its absorption of light and thus its reflectivity. There are actually many constraints that must be obeyed by a phase change material to be useful for CD or DVD storage. Among them are: the melting temperature must be much higher than room temperature so that the material properties will stay constant over time (stable information storage) but it must not be so high that heating it will destroy or damage the remainder of the CD or DVD — a typical temperature aimed at is 500oC; there must be a large energetic barrier between the crystal and amorphous phase so that one will not spontaneously change to another at room temperature, but it must not be too high so that this change is easy to make at higher temperatures; there must be high optical contrast between crystal and amorphous regions; the cooling rate for annealing must not be very slow so that once can write the data at a high rate; and that the mechanical stress induced by changing the phase should not damage either the phase change material itself or the neighboring layers.
This is a very long list of demands! And some are mutually contradictory, so tradeoffs have to be made. But there are classes of materials that fit the bill. They are all alloys typically containing Te (tellurium) and Sb (antimony) along with other elements. Some typical formulae are TeGeAs, Ge2Sb2Te5, TeSnSe, TeGeSnO, or AgInSbTe. A more comprehensive list shows that they are all alloys based on Te and Se. Both Te and Se are well known glass making materials, and the chemical modifications and alloying are to optimize the melting/optical/mechanical/annealing/quenching properties.
Having all this material science under our belt, the last question is more pragmatic: how does one do the writing and/or erasing of information onto the CD or DVD? And how is the information encoded? The convention chosen is that when the phase change material is crystalline, no information has been encoded: there is information encoded when parts of it are amorphous.
A CD or DVD burner is the device used for this purpose, and it has three different lasers (instead of the one laser in a CD or DVD reader). Here are what each laser does as well as how it works with the material to encode information:
- The first laser is the read laser and is of low intensity and essentially identical in specification to the laser in a normal CD or DVD player.
- A second laser, the write laser, has high power: when its beam is focused on a small spot, it can melt the phase change material completely in that region — combined with rapid cooling to quench, it will make the material amorphous thus encoding information. The minimum cooling rate for quenching to an amorphous phase is dictated by the particular material; in the CD/DVD the cooling range is determined by the thickness of the phase change material, the specific heats of all the phase change and surrounding materials, and their thermal conductivities. Thus the choices of materials and their assembly must be engineered to ensure that the cooling rate is fast enough to give an amorphous phase once the write laser is turned off and the phase change material’s temperature falls below its melting point.
- The third laser is the erase laser and has medium intensity: it is stronger than the read laser but weaker than the write laser. It can heat up the material enough to make the amorphous material into a flowing glass (i.e. bring it above the crystallization temperature) but not hot enough to actually melt it. Thus the erase laser makes the amorphous material flow and rearrange. One keeps the erase laser on for a sufficiently long time to allow for the growth of the crystalline phase; once it is off, the cooling rate is rapid and is the same as described above for the write laser. Once crystallized, all the information in that region has been erased.